In order to finish the installation of the BMC DIA airbox, I ordered a few extra parts which arrived yesterday... just in time for the weekend!
The original oil vapour recovery air filters I ordered were unfortunately the wrong size, so I had to order a pair of smaller one (13mm ones). I've also ordered some oil resistant 13mm hose for connecting the filters.
On the airbox side, I ordered a 45 degree bend and some straight 70mm hose for the driver's side and some straight 70mm hose for the passenger side to replace the flexible alluminium piping.
I'll try and get it all installed this weekend and post some pictures.
Friday, June 30, 2006
Friday, June 23, 2006
Larini exhaust for Maserati Ghibli
I finally got around to uploading a video clip I took a couple of years back after having the Larini Sports exhaust system fitted to my Ghibli. The quality is not great since I just used my old digital camera, but it gives a good impression.
Should have taken a clip of the before sound really.
Wednesday, June 21, 2006
Rica dyno postponed
The missus had an unexpected visit to the hospital this week, which means that I've had to defer my visit to the dyno probably for a couple of weeks while I focus my attention on getting her fit and well again.
In the meantime, I'll order some new bits of silicone and make the installation of the airboxes a bit more robust. I might also do a rough set up of the E-boost on the road, just to get it running a bit safer with less overboost.
Also, the car is due for an APK (road worthiness test). Jorrit at Auto Forza is fully booked up until next month, so I'll have to get the APK done locally and just hope that nothing needs doing to the car (hopefully it will pass the emissions test OK now that the Lambda probe has been fixed?).
Sunday, June 18, 2006
Maserati Ghibli - Wikipedia, the free encyclopedia
If you're after an official definition of a Maserati Ghibli, check out Wikipedia of course!
Monday, June 12, 2006
Appointment booked with Rica
I've booked an appointment with Rica for the 20th June, so should have dyno results then to post. Would like to have gone sooner but seems they're pretty booked up at the moment.
However, I shouldn't complain since this gives me time to sort out a few other things. I had another look at replacing the alluminium flexible pipe this weekend and think I can do it with an additional few 70mm silicone bits, namely another 45 degree elbow and another straight section to couple up with the 90 degree elbows that I already have. Only problem is that I want them in black, which doesn't seem to be well stocked oddly? Everyone seems to like blue?
I also looked at the fastenings again and have sorted out something far more satisfactory. And I remeasured the oil vapour recovery hose... looks like it's more like 13mm diameter, which means I ordered the wrong size cone filters... oh well!
Was just looking at the IHI turbos website... the turbos fitted to these cars are capable of producing 2.8 bar! That's pretty impressive and perhaps a bit wasted on the Ghibli? I'm looking forward to seeing at what revs I'm getting 1.2 bar at now.
Thursday, June 08, 2006
Maserati Burnout!
Poor car! I know it's not a Ghibli, but my Ghibli does at least have the same turbos as this car, so there is a connection!
Shell recommended engine oil for Maserati Ghibli
 A couple of years back, just after purchasing my Ghibli, I wrote to Shell to ask what engine oil they recommended for my car. Shell offers a technical advice service where they'll recommend which of their products best suits your car if you give them details about your car.
They came back with two options, one using a synthetic oil and the other using conventional oil. Apparently it's not recommended mixing synthetic and conventional oil products, so they suggested that if the car had been running on conventional then to continue with this.
Here's the data sheets outlining the two oils they recommended:

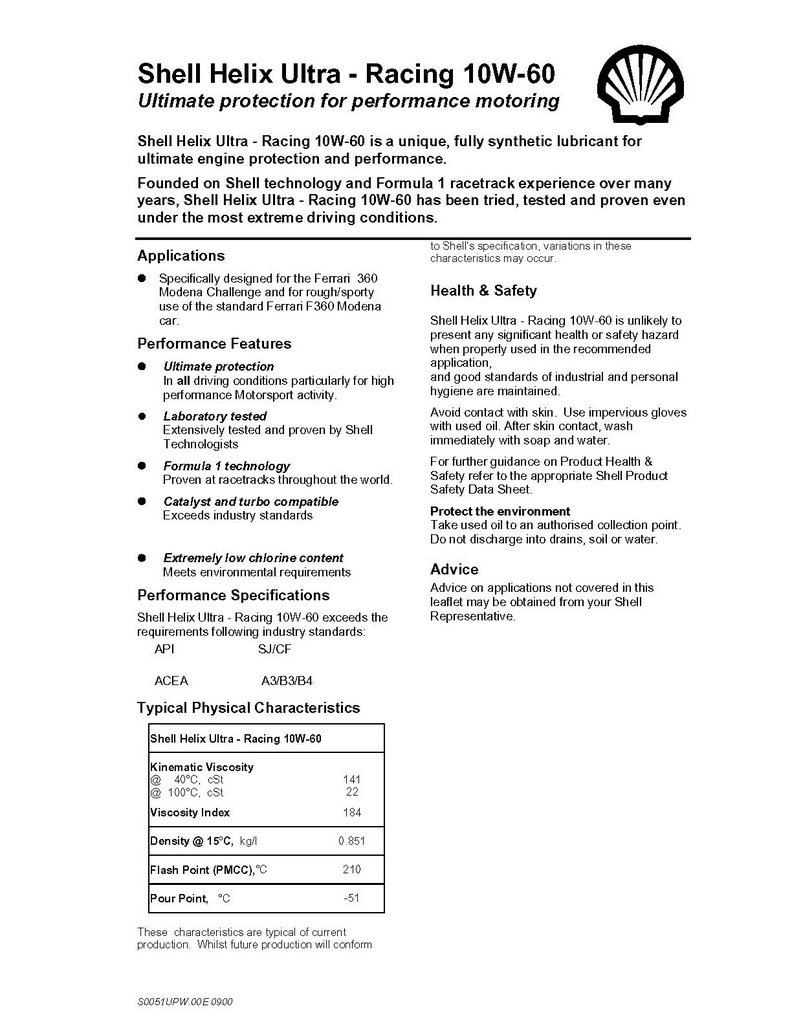
Bear in mind that I have the 2.0 liter MY92 car and that different oil may be recommended for different engines.
Wednesday, June 07, 2006
Turbosmart E-Boost 2 fitted to Maserati Ghibli
A while back I fitted Turbosmart's E-Boost 2 to my Ghibli and have mentioned it a few times in previous posts. At the weekend, after fitting the BMC DIA airboxes, I remembered to take a couple of photographs which I thought I'd post.
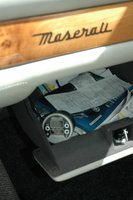 The E-Boost kit comes in two parts, the gauge (which houses all the electronics) and a solenoid, which is the three way valve that physically controls the engine's boost pressure. I intended to locate the guage in the foot well on the passenger side along with the car's engine management system. I assumed that once the system was set up then I wouldn't need to see the guage, but just trust that it's working. This may ultimately be what I do, but in the meantime I just have it located in the glove compartment where it is easily accessible and where I can see it if need be. The guage reads the inlet pressure by T-ing into the hose that feeds air to the pressure guage on the dashboard. I T-eed into this line behind the steering column using the plastic T and silicone hose that came with the kit, and fed the hose round the back of the center console to the glove compartment.
Power for the guage comes from T-ing into the power supply for the radio in the center console, running cable again to the glove compartment and wiring into the loom provided with the kit via the supplied fuse.

A pair of wires was then run from the guage, through the firewall (via an existing wire port) to the solenoid. I located the solenoid in place of the OEM solenoid, which is just behind the plenum chamber on my MY92 Ghibli. The documentation that comes with the kit recommends leaving the existing solenoid in place, since on modern cars there's a feedback signal from the solenoid that enables the car's ECU to determine if the solenoid is working. However, on my Ghibli, it seems that the OEM solenoid is not that sophisticated, since the car runs fine with the OEM solenoid removed.
The solenoid uses the existing wastegate and inlet pressure control hoses and vent hose, so connecting to these is as simple as removing the hoses from the OEM solenoid and connecting them to the appropriate ports of the Turbosmart solenoid valve.
And that's about it for the physical installation. Pretty simple really... but then the electronic control needs seeting up which takes a bit more effort and to be done safely really needs to be carried out on a rolling road. The set up procedure is well documented in the manual so I won't go through it here... but it's quite simple to understand and follow and carrying it out on a rolling road is really easy, since the boost pressure can be set on the fly in real time reading real inlet pressure which is nice. Setting up the controller gain (sensitivity) is a bit more tricky and unless you're comfortable doing this yourself I'd advise getting some help from someone who knows what they're doing.
Before playing with any of the settings, it's very important to set the cut out pressure to prevent overstressing the engine! I think mine's set to about 1.3 or 1.4 bar... if the inlet pressure hits this then the solenoid opens up and quickly bleeds off this pressure, keeping everything safe.
I've got my guage to beep at me when the pressure exceeds 1.2 bar which is quite useful for reminding you to change gear. Can get a bit annoying though... last year I was driving back from Germany rather quickly, so the thing was beeping away continously at me. But for general driving you'll hardly ever hear it. But it is amusing seeing peoples bemused faces in the passenger seat... "what's that beeping?".
You can set the guage up to read the engine's RPM by tapping into one of the distributor wires, but I've not done this.
I got this controller because I was having trouble controlling the inlet pressure with the OEM solenoid and couldn't track down the cause. I had a brand new OEM unit but was only getting fail safe boost of 0.7 bar. I couldn't track down the cause, and ultimately put it down to something strange going on with the ECU. Otherwise, I would have been happy continuing to use the OEM unit, with Rica Chiptuning fiddling with the pressure map on the ECU. However, I'm very happy with the E-Boost since it's easy to use and enables me to fiddle with things without having to rely on a chiptuner. It also enables future projects such as Aquamisting...
 The E-Boost kit comes in two parts, the gauge (which houses all the electronics) and a solenoid, which is the three way valve that physically controls the engine's boost pressure. I intended to locate the guage in the foot well on the passenger side along with the car's engine management system. I assumed that once the system was set up then I wouldn't need to see the guage, but just trust that it's working. This may ultimately be what I do, but in the meantime I just have it located in the glove compartment where it is easily accessible and where I can see it if need be. The guage reads the inlet pressure by T-ing into the hose that feeds air to the pressure guage on the dashboard. I T-eed into this line behind the steering column using the plastic T and silicone hose that came with the kit, and fed the hose round the back of the center console to the glove compartment.
Power for the guage comes from T-ing into the power supply for the radio in the center console, running cable again to the glove compartment and wiring into the loom provided with the kit via the supplied fuse.
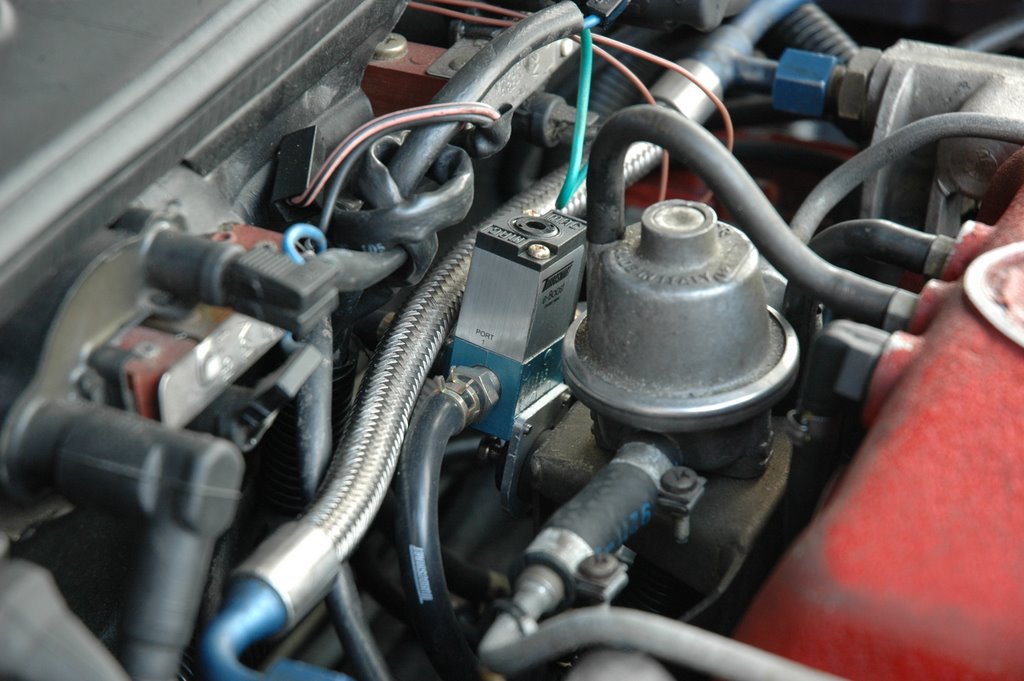
A pair of wires was then run from the guage, through the firewall (via an existing wire port) to the solenoid. I located the solenoid in place of the OEM solenoid, which is just behind the plenum chamber on my MY92 Ghibli. The documentation that comes with the kit recommends leaving the existing solenoid in place, since on modern cars there's a feedback signal from the solenoid that enables the car's ECU to determine if the solenoid is working. However, on my Ghibli, it seems that the OEM solenoid is not that sophisticated, since the car runs fine with the OEM solenoid removed.
The solenoid uses the existing wastegate and inlet pressure control hoses and vent hose, so connecting to these is as simple as removing the hoses from the OEM solenoid and connecting them to the appropriate ports of the Turbosmart solenoid valve.
And that's about it for the physical installation. Pretty simple really... but then the electronic control needs seeting up which takes a bit more effort and to be done safely really needs to be carried out on a rolling road. The set up procedure is well documented in the manual so I won't go through it here... but it's quite simple to understand and follow and carrying it out on a rolling road is really easy, since the boost pressure can be set on the fly in real time reading real inlet pressure which is nice. Setting up the controller gain (sensitivity) is a bit more tricky and unless you're comfortable doing this yourself I'd advise getting some help from someone who knows what they're doing.
Before playing with any of the settings, it's very important to set the cut out pressure to prevent overstressing the engine! I think mine's set to about 1.3 or 1.4 bar... if the inlet pressure hits this then the solenoid opens up and quickly bleeds off this pressure, keeping everything safe.
I've got my guage to beep at me when the pressure exceeds 1.2 bar which is quite useful for reminding you to change gear. Can get a bit annoying though... last year I was driving back from Germany rather quickly, so the thing was beeping away continously at me. But for general driving you'll hardly ever hear it. But it is amusing seeing peoples bemused faces in the passenger seat... "what's that beeping?".
You can set the guage up to read the engine's RPM by tapping into one of the distributor wires, but I've not done this.
I got this controller because I was having trouble controlling the inlet pressure with the OEM solenoid and couldn't track down the cause. I had a brand new OEM unit but was only getting fail safe boost of 0.7 bar. I couldn't track down the cause, and ultimately put it down to something strange going on with the ECU. Otherwise, I would have been happy continuing to use the OEM unit, with Rica Chiptuning fiddling with the pressure map on the ECU. However, I'm very happy with the E-Boost since it's easy to use and enables me to fiddle with things without having to rely on a chiptuner. It also enables future projects such as Aquamisting...
Tuesday, June 06, 2006
BMC DIA airbox fitted to Maserati Ghibli
This weekend I fitted the BMC DIA airbox to my Maserati Ghibli (and got sunburn on my lower back in the process... a warning to all car enthusiasts working on their cars outside in the sun!).

I started on the driver's side (I have a left hand drive Italian 2.0 liter model) and removed the OEM airbox and intake system back to the compressor inlet. I reused the existing 45 degree elbow and to this connected a 50 mm hose connector (seems that the existing inlet system is actually a bit smaller than 50 mm diamter since I struggled to get the elbow to fit onto the connector). I then fitted the straight 50 to 70 mm reducer, unfortunately in blue since they were out of stock in black ones at Auto Sport Parts.


The flexible alluminium pipe that came with the BMC DIA kit was then utilised by fixing this to the reducer via a 70 mm hose connector. The flexible pipe was then shaped and trimmed and the BMC DIA airbox fixed onto the end of this. The fitting of the driver's side system went reasonably smooth, since there's a fair bit of room to maneuver on this side. I'm actually not too happy with the flexible allumium pipe, since it feels a bit too delicate and I worry that it might leak... I'm therefore planning on changing it out to a silicon 90 degree elbow (maybe this weekend). I think it's meant to be utilised as a feed pipe to the inlet of the airbox to siphon cold air from the front of the car. In this application, it doesn't really matter if it leaks, but I don't want unfiltered air making it to the compressor (let alone the engine).

To fasten the airbox I used the drilled alluminium strip that came with the kit. I'm not too keen on this stuff and there's not a lot of places in the engine bay to fix it. I used a screw that fastens the filler spout to the windscreen washer tank, but soon wished I hadn't seen the alluminium strip twisted and made a hole in the plastic spout, leaking water into the engine bay. Will have to rectify this at the weekend, but have an idea where I will fasten it... or maybe even make a dedicated fastener.


The procedure for the passenger side was identical except that there's less space here making it a bit more fiddly. This is particularly highlighted by the fact that the inlet hose passes very close to the exhaust manifold on this side... so much so (only a few millimeters clearance) that I'm concerned that the silicone restrictor may not be able to cope with the temperature. So I may need to get a longer 50 mm connector hose (which is not the preferred option, since it lengthens the amount of 50 mm hose which is what I'm trying to minimise) or maybe clad the silicone with allumium foil (not very attractive but probably sufficient to shield the silicone from the heat radiation).
As with the driver's side, I'm not too happy with the alluminium flexible pipe or the fixing bracket, so I plan to improve on these at the weekend.

Another thing that needs sorting this weekend are the oil vapour recovery filters. I've currently installed a make do, temporary solution, but the filters need fitting much better. I plan to get hold of some longer lengths of hose and have the filters located at the front of the engine block, just fore of the O rings that support the OEM oil recovery hoses.
So... the moment you've all been waiting for... how do they perform?
Well, I took it easy for the first 10 to 15 mins to let everything warm up while listening out for any strange noises. Everything seemed to be going OK so I started to open her up a little. First of all, the car feels much more torquey... even in 5th and 6th gears, the car seems a bit more enthusiast between 3000 to 4000 rpm. I can also hear the turbos spooling up with a faint whizz when I floor it at 3000 rpm.
Another nice sound is revealed when I lift off the throttle... there's now a nice throaty intake roar.
Top end performance... well... the car is now breaking traction on dry roads when I floor it in 2nd gear. So that's a good sign. Also, seems that the boost pressure is now spiking. The E-Boost boost controller appears to be venting off boost pressure when accellerating hard, since the car gives a judder and when I try and watch the E-Boost gauge I see it climbing into the mid 1.2s followed by a quick drop to 1.19 bar. This indicates that boost pressure is reaching the safety cut out level, which means it must be spiking. This is good news indeed!
I plan to take the car to Rica Engineering this week to reset the E-Boost controller and check the fuel map. I should be able to set up the E-Boost to ramp up to just over 1.2 bar and then hold it for the remainder of the gear, which should give good, safe, reliable performance. I'll also get a dyno run done and see what's happening in real terms.
I'll keep you posted...
I started on the driver's side (I have a left hand drive Italian 2.0 liter model) and removed the OEM airbox and intake system back to the compressor inlet. I reused the existing 45 degree elbow and to this connected a 50 mm hose connector (seems that the existing inlet system is actually a bit smaller than 50 mm diamter since I struggled to get the elbow to fit onto the connector). I then fitted the straight 50 to 70 mm reducer, unfortunately in blue since they were out of stock in black ones at Auto Sport Parts.
The flexible alluminium pipe that came with the BMC DIA kit was then utilised by fixing this to the reducer via a 70 mm hose connector. The flexible pipe was then shaped and trimmed and the BMC DIA airbox fixed onto the end of this. The fitting of the driver's side system went reasonably smooth, since there's a fair bit of room to maneuver on this side. I'm actually not too happy with the flexible allumium pipe, since it feels a bit too delicate and I worry that it might leak... I'm therefore planning on changing it out to a silicon 90 degree elbow (maybe this weekend). I think it's meant to be utilised as a feed pipe to the inlet of the airbox to siphon cold air from the front of the car. In this application, it doesn't really matter if it leaks, but I don't want unfiltered air making it to the compressor (let alone the engine).
To fasten the airbox I used the drilled alluminium strip that came with the kit. I'm not too keen on this stuff and there's not a lot of places in the engine bay to fix it. I used a screw that fastens the filler spout to the windscreen washer tank, but soon wished I hadn't seen the alluminium strip twisted and made a hole in the plastic spout, leaking water into the engine bay. Will have to rectify this at the weekend, but have an idea where I will fasten it... or maybe even make a dedicated fastener.
The procedure for the passenger side was identical except that there's less space here making it a bit more fiddly. This is particularly highlighted by the fact that the inlet hose passes very close to the exhaust manifold on this side... so much so (only a few millimeters clearance) that I'm concerned that the silicone restrictor may not be able to cope with the temperature. So I may need to get a longer 50 mm connector hose (which is not the preferred option, since it lengthens the amount of 50 mm hose which is what I'm trying to minimise) or maybe clad the silicone with allumium foil (not very attractive but probably sufficient to shield the silicone from the heat radiation).
As with the driver's side, I'm not too happy with the alluminium flexible pipe or the fixing bracket, so I plan to improve on these at the weekend.
Another thing that needs sorting this weekend are the oil vapour recovery filters. I've currently installed a make do, temporary solution, but the filters need fitting much better. I plan to get hold of some longer lengths of hose and have the filters located at the front of the engine block, just fore of the O rings that support the OEM oil recovery hoses.
So... the moment you've all been waiting for... how do they perform?
Well, I took it easy for the first 10 to 15 mins to let everything warm up while listening out for any strange noises. Everything seemed to be going OK so I started to open her up a little. First of all, the car feels much more torquey... even in 5th and 6th gears, the car seems a bit more enthusiast between 3000 to 4000 rpm. I can also hear the turbos spooling up with a faint whizz when I floor it at 3000 rpm.
Another nice sound is revealed when I lift off the throttle... there's now a nice throaty intake roar.
Top end performance... well... the car is now breaking traction on dry roads when I floor it in 2nd gear. So that's a good sign. Also, seems that the boost pressure is now spiking. The E-Boost boost controller appears to be venting off boost pressure when accellerating hard, since the car gives a judder and when I try and watch the E-Boost gauge I see it climbing into the mid 1.2s followed by a quick drop to 1.19 bar. This indicates that boost pressure is reaching the safety cut out level, which means it must be spiking. This is good news indeed!
I plan to take the car to Rica Engineering this week to reset the E-Boost controller and check the fuel map. I should be able to set up the E-Boost to ramp up to just over 1.2 bar and then hold it for the remainder of the gear, which should give good, safe, reliable performance. I'll also get a dyno run done and see what's happening in real terms.
I'll keep you posted...
Friday, June 02, 2006
BMC accessories
After having a bit of trouble with my credit card, I ended up sourcing the new hoses that I require to fit the BMC airboxes from a local supplier, Auto Sport Parts in Delft.
I'm planning on fitting it all tomorrow (pending the weather). I just hope it all fits!
Will post some pics this weekend and then try and take the car along to Rica during the week.
I'm planning on fitting it all tomorrow (pending the weather). I just hope it all fits!
Will post some pics this weekend and then try and take the car along to Rica during the week.
Thursday, June 01, 2006
Posting on Enrico's Maserati Pages
Enrico posted a couple of my old emails to him on his website. Click on the link above and then scroll down the page...
Subscribe to:
Posts (Atom)